Sunday, March 31, 2013

Happy Easter!

I really wanted to do some awesome Easter nail art, but time just got away from me with swatching last night.  I did this yesterday afternoon before all that got going, so I guess this is technically cheating since it isn't actually the mani I'll be wearing for Easter.  However, it is awfully cute, so I decided to share anyways!  :)


I haven't stamped in a really long time so, looking for some quick nail art, I grabbed BM-302 with the spring and Easter patterns on it.  I was really happy with my Bundle Monster plates from Nail Polish Canada, but this is the only image in the whole set that came scratched.  Grrr. 


I already had LaCC 1992 on my nails, because I had a ballet photoshoot earlier in the day and needed a neutral look.  (Creep my IG for those photos soon!  Link in the sidebar.--> )  I stamped the design from BM-302 with Konad special pink polish, and topped it off with some Seche Vite.   


The mani that I'm actually wearing today is LaCC 1977 topped with Different Dimension Social Suicide, because it matches the dress I wore to Church this morning!  I'll post photos of that somewhere, at some point.  Maybe.  Hopefully.  


I would say that I'm looking forward to spending the rest of the day with family, but truth is that we'll probably all be off doing our own things around the house (swatching for me) until soon before dinner.  I am really looking forward to dinner tonight though, my mom makes such good food for holidays!  

Anyone else have any exciting plans or familiar traditions for today?  Whatever you're doing, make it a great day!  :)

Saturday, March 30, 2013

Cadillacquer: Do You See What I See?

A while ago I was contacted by the lovely Madeleine from Cadillacquer, asking if I'd like to swatch and review her first collection.  Despite being naturally slightly apprehensive about the quality of newer less-established brands,  I couldn't resist her pretty polishes and said yes.  Boy, am I ever glad I did; these polishes were all such a pleasant surprise!  


Read on after the jump for more on all nine polishes!  :)

Friday, March 29, 2013

Cheshire Cat

About a year ago, I stumbled upon some YouTube videos of the Royal Ballet's Alice's Adventures In Wonderland, and it quickly became one of my favourite ballets.  That's why I was so excited when, in London, my dad and I stood outside the Royal Opera House for three hours in the freezing cold to get day-of tickets for a performance!  

There are a few movie theaters around town that play recorded live streams of ballets and operas happening around the world, and by coincidence they were playing Royal Ballet's Alice's Adventures In Wonderland last night! I enjoyed it SO much the first time that I just had to go again, but this time with my mom and sister who weren't in London.  Since I didn't have all my nail art supplies with me in London, I was determined to do some Wonderland-inspired nail art this time around!   


Anywho, long introduction done, here's the nail art I did, inspired by the Cheshire Cat!  That thing in the Disney version creeps me out, but the way they did it in the ballet was so cool!  


It should come as no surprise that the stunning glitter in this mani is CrowsTows Cheshire, the perfect mix of colours to match this cat.  You're seeing one dabbed coat over Zoya Savita, with two coats of Seche Vite.  This polish is available through Llarowe


My ring finger is Savita with purple and gold striping tape from the Born Pretty Store.  My thumb is the same base colour, and I free-handed the cat's floating mouth and eyes with acrylic paint and a teeny-tiny brush.  


I'm still not very confident in my free-hand nail art abilities, and the perfectionist in me makes things like this take a really long time.  I'm working on it though, and I'm hoping to get better at it!  

I really enjoyed wearing this, although the cat was creeping me out a bit every time it stared at me.  How do you like my Cheshire Cat nail art?  Do you think it accurately represents the character?  :)

Wednesday, March 27, 2013

Aphrodite Lacquers: Romes & Jules Collection

Today's post is a long-overdue review of four polishes from Aphrodite Lacquers' Romes & Jules Collection for spring!  All of the formulas were the same, so I'll address that at the end of the post. You can see my swatches of previous Aphrodite Lacquers collections by following these links, but make sure you come back and take a look at these!  Romance Novel, Outta This World, Friday Night Glitter Bomb, Printemps A Paris, and Birthday collections. 

Now, on to the stars of today's post!  First up is my favourite of the four, Montagues.  This stunner is a "black jelly polish filled with pink, green, blue, and purple hex and circle glitters."


Although it can be built up to opacity alone, I chose to layer two coats of Montagues over A England Jane Eyre for a more opaque look and faster drying time.  You're seeing one coat of Seche Vite, but I added another later for a completely smooth finish.  


Circle glitters are kind of my new favourite thing and I always love me a good vampy colour, so when Rebecca asked me if there were any specific polishes I wanted to swatch, I, of course, chose this one.  It doesn't disappoint!  


Violent Delights is a "milky white jelly polish, packed with white glitters of various sizes and all the different pink and purple glitters from this collection, and holo microglitters scattered throughout."  


As with all four of the polishes in this post, Violent Delights can be built up to near-opacity alone, but I layered this one in two coats over OPI My Boyfriend Scales Walls.  This glitter was a little lumpy, so I topped it with two coats of LaCC 2013 top coat for a nice smooth shine.  


I really like the milky white base with white glitters and other colours peeking through.  The scattered red glitters make me think this one was very appropriately named!  


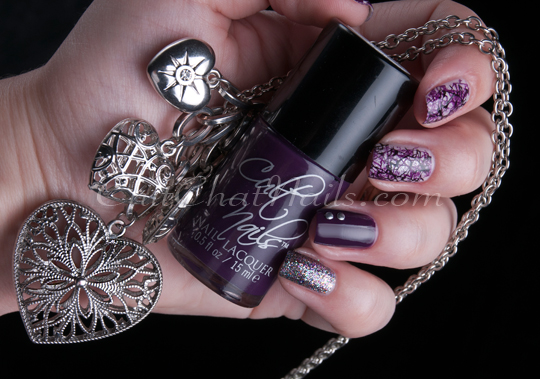
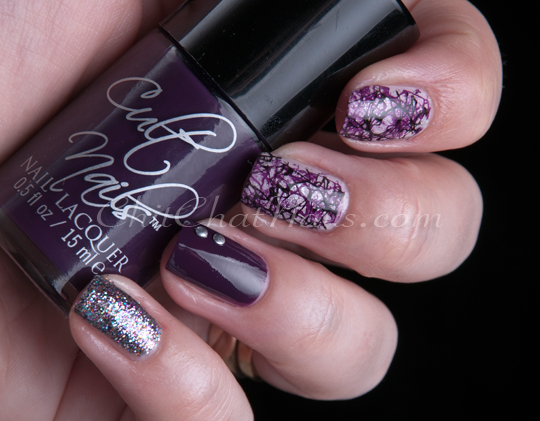
Next up is my second favourite of the polishes here; Two Star Crossed Lovers is a "milky light purple polish, lots of different purple and holo glitters, with a hidden purplish-pinkish shimmer." 


Yea, just felt like throwing that excerpt from the prologue in there.  I layered two coats of Two Star Crossed Lovers (which I keep thinking should be 'Two Star-Cross'd Lovers', because I'm weird) over LaCC 1972, a lilac creme which made the perfect base.  One coat of LaCC 2013 top coat here. 


I really love the mix of glitters in this one, it's such a delicate and pretty polish!  This polish makes me want spring to come, it snowed here the other day!  Grrr...


Last for today is Inauspicious Stars, a "milky white jelly polish, with white glitters of various sizes, and pastel pink/purple/blue glitters, and holo microglitters scattered throughout."  


I layered two coats of Inauspicious Stars over OPI My Boyfriend Scales Walls, and topped with two coats of LaCC 2013 top coat for a smooth finish. 


Whites don't usually look good on my skin tone (especially in pictures) but I'll make an exception for this one because it's so pretty!!  Another lovely delicate polish perfect for spring! 


Formulas on all these polishes were alright to work with; no major problems but they did require a little extra manipulating with the brush to get an even spread of glitter.  A couple of them were slightly lumpy, but nothing a good layer or two of top coat can't fix!!  

You can find Aphrodite Lacquers on Etsy, and keep up to date on Facebook.  All of these polishes are currently in stock except for Montagues, but you can still pick up it's white-based counterpart Capulets!  

How are you liking the look of this spring collection?  I really like Montagues and Two Star Crossed Lovers, but which polishes are your favourites?  :)


Disclaimer: Products in this post were provided for review and my honest opinion.  

Monday, March 25, 2013

The Wild Rover

I've been having some computer problems over the past few weeks (since before I left for Europe,) but luckily my dad helped me get it all fixed yesterday.  Now I've got a ton of swatches and nail art photos to edit, but of course I've already got a post ready for Castle Mani Monday!!


Tonight's episode is called 'The Wild Rover'; it's centered around Detective Kevin Ryan, which I'm super excited about because I love Ryan!  Because of the case, he is forced to re-visit his past role as an undercover narcotics cop working with the Irish mob. 
Seamus Dever as Det. Kevin Ryan
Ryan is your "shirt, tie, and sweater-vest" kind of guy, so I chose to do some nail art representing that!


I started with two coats of Orly Snowcone, and topped it with SV to speed up the drying.  Once that was ready, I used striping tape to mark off the tie shapes, and then filled them in with piCture pOlish Electric Blue.  The polka-dots were done with a makeshift dotting tool and LaCC 1976.  Finished with some Seche Vite for a smooth finish! 


I think this is a pretty cute look, and it represents Ryan well!  Do you agree?  Anyone else as excited for tonight's episode as I am?  :)

Sunday, March 24, 2013

I'm back!

Well, I've actually been back since really late Wednesday night.  Or really early Thursday morning; take your pick.  The past couple days have been spent unpacking and catching up on a ton of swatching, but I've finally got a post ready!!


If you've been following along with the guest posts, you'll know that I went to Switzerland, France, and England for two weeks!  The trip was a ton of fun, and the audition went pretty well!  I didn't get in, but since they started with 150 girls and I made it through multiple stages of elimination down to the last 22 girls (out of whom they accepted 15), I'd say it went well!  


I'll be going to a post-graduate pre-professional dance program in Canada next year, and I'm still really happy with the result; it's a great school and I don't feel like I'm settling for it at all.  I'm really excited!  

Anywho, here's some photos of my travelling nails!  Left to right and top to bottom, these were taken in Lausanne, Geneva (Jet D'Eau), Zurich (Grossmünster and Fraumünster), Paris (Eiffel Tower), Paris (Sacre Coeur in Montmartre), and London (Big Ben/Parliament).  I'm wearing Essie Macks and OPI Stay The Night.  :)


As for the nail art, I chose to the flags of the three countries I visited.  Conveniently for me, they all have the same colour scheme!!  


I started with a base of OPI My Boyfriend Scales Walls for all the nails.  I then taped off the different shapes and added red and/or blue, in LaCC 1945 and Essie Mesmerised.  I ended up badly freehanding the Union Jack in acrylic paint because the striping tape was too skinny; oh well.  My pinky and thumb nails are OPI MBSW with one coat of piCture pOlish Ruby Blou.  All nails are topped with two coats of Seche Vite, as always.


Although I did enjoy my break, I'm really looking forward to getting back to blogging and doing my nails frequently!  :D

Tuesday, March 19, 2013

Guest Post: Manicurator

Today is the last guest post, since I'm on my way back home tomorrow.  Since I'm writing this in advance, I'll say that I hope I've had a fantastic time and that everything went well, but I'll write up a post (maybe include some travel pictures) when I get back home and settled! 

Now on to what you'e all come here for; today's guest post comes to us from Victoria, though you may know her better as the Manicurator!  Take a look at what she's created!  :)
_____

I'm great at "planning ahead" but not so good (ok, terrible) at "doing ahead". So when Emma asked me to guest post I felt like I had all the time in the world. And then blammo, it's due tomorrow (ok, today). So I needed something that could be done relatively quickly but isn't boring. I also knew I wanted to incorporate some of my untrieds. So this is what I came up with. 

I applied two coats of Nicole by OPI Please Red-cycle, which is new for Spring 2013. Once it was dry I used striping tape to block off the middle and dabbed on 1-2 coats of Nicole by OPI Luke of the Draw from their Modern Family collection. I hadn't tried either of these before and was quite pleased with them. The red has such a nice formula..which I greatly appreciated as I was coffee jittery and in a hurry. Not a good pair :P Once I peeled the tape off I used a dotting tool to lift and place my loose glitter squares which I purchased from Etsy. Top coat with Seche and done! WOO! 


I'm honored to be able to contribute a post for lovely and super talented Emma while she is out of town exploring the world and achieving her goals. Best of luck to you and HAVE FUN!!  :)
_____

I was so excited when Victoria agreed to write a guest post for my blog, I really admire all her impeccable nail art and swatches!  Thank you so much,Victoria, for the fabulous post!  Remember to go check out her blog, the Manicurator!  :)

This wraps up my series of guest posts; a huge thank you to all the talented bloggers who have helped me with guest posts during my trip, everyone has gone above and beyond!  I'll be back within a few days with my own post about my trip, and hopefully get back to regular posting very soon!!  :)


Monday, March 18, 2013

Guest Post: Accio Lacquer

As with Alexis' Eiffel Tower nail art while I was in Paris (see yesterday's post,) today's post also co-ordinates with my activities in Europe.  Today could quite possibly rival being in Paris; where am I going, you may ask?  To the Warner Brothers Leavesden Studios!!!!  :D  For those of you who live under a rock, it's the studios where all the Harry Potter movies were filmed, and most of the sets are still there to tour!  

On to today's guest poster; she's still relatively new to the nail blogging scene but has some amazing photos and the most entertaining writing style of any blog I read!  Bringing us a Harry Potter-themed nail polish post, please welcome fellow geek, Mishka from Accio Lacquer!!  :D

Follow the jump for her whole post!

Sunday, March 17, 2013

Guest Post: XOXO Alexis Leigh

Today is my last day in Paris, and I've got a very special guest post for you all!  You know that I just couldn't have a whole bunch of guest posts without one from this amazing girl.  She's become a really good blogging-friend of mine and is super talented; please welcome Alexis from XOXO Alexis Leigh!  :)
_____ 

Hi guys! My name is Alexis from XOXO Alexis Leigh and I'm super excited to be here on Emma's amazing blog once again! Last time I was here I did some pink ballerina inspired nail art since Emma is an extremely talented ballerina. This year I knew before doing my guest post that Emma would be going to Eurpoand an image of thEiffel Tower instantly popped into my head. Although the design went in a little bit of a different direction then I had originally planned I still really like it and I hope you guys will too!


I started out with a base of Pomegranate Lacquer - Dreamscape (3 coats) then I decided to sponge some silver on my tips with LVX - Luxe followed by another coat of Dreamscape and then some VERY light sponging with Luxe once again and finally... a coat of MASH Matte top coat. Was all of this necessary? Probably not! Did it look pretty in the end? I think so! For the ring finger I grabbed my trusty long striper and black polish and created an outline of the Eiffel Tower. I filled the tower in with white acrylic paint and then went back in with my striper and black polish to create the criss cross pattern. I finished it all with a coat of the matte top coat.


I'm not sure if it's easy to tell but the thumb is supposed to be a ballerinpracticing in front of a barre looking in the mirror. For the base I used Essie - No Place Like Chrome. I mixed LVX - Ecru and Lime Crime - Milky Ways for her skin and used LVX - Koko for her hair (the lighter parts are Koko and Milky Ways). I sealed it with a fast dry top coat and then the Mash matte top coat like the rest. I really liked this nail and thought all in all it was a really pretty combination.


For the last 4 nails I debated placing black rhinestones on each nail but instead thought the hearts would look better. I really really love how these turned out and the color combination combined with the matte finish looked really pretty to me.


That's all! How do you guys like these nails, have you ever been to Paris (if so, I'm very jealous!!!)? Thank you so much Emma for letting me take over for today, I hope you have and absolutely incredible trip!!!!! <3
_____

Isn't this just the most amazing nail art ever?!?!?  I'm tempted to re-do these myself, I love them so much!  Every time I see one of Alexis' nail art looks I think she could never get better, but she proves me wrong every single time and keeps out-doing herself!  You all need to head over to Alexis' blog right now and follow her.  Go.  Now.

Thank you so much for the wonderful post Alexis!! :) <3 

Saturday, March 16, 2013

Guest Post: Crystal's Crazy Combos

Today's guest post comes from the lovely Crystal of Crystal's Crazy Combos!  Her blog is a constant and reliable resource for me when looking for swatches (especially of indie polishes) so of course I had to ask her to create a post for us all!  Follow the jump for the full post!


Thursday, March 14, 2013

Guest Post: Love, Varnish, Chocolate and More

I'm on my way to Paris this morning, SO excited!!  :D  Today's guest post was written by the lovely Deborah of Love, Varnish, Chocolate, and More.  I had been following her blog for quite a while, and I was so excited when she featured me in her Bloglight post a few months back!  Of course when I was thinking of bloggers I'd love to have guest post, Deborah immediately came to mind!  :)
_____

Hi everyone! My name is Deborah, and I run a little blog called Love. varnish, chocolate and more... also known as Love Varnish. I discovered Emma's blog a while ago and I really loved it from the start, so I was honored when she asked me to do a guest post for her!

When I asked about the specifics she said it only had to be true to my style.. but what is my style? I don't know... my pictures are my trademark I guess ;-).

Now I wanted to do something fitting for the coming Spring (is it here already! I need warmer weather!), and I had Barry M Prickly Pear still untried. This was sent to me by the lovely Hannah from Polly Polish when I won her giveaway! I used 2 easy coats of this beauty and let it dry for a while. I must say it had a gorgeous shine all by itself when it was dry!


Then I grabbed a Bundle Monster stamping plate, number 323, and China Glaze Harmony. Harmony was part of the Romantique collection for Spring 2009. It consisted of 12 metallic colors which are all great for stamping. Unfortunately it is discontinued but you can still find some of them for reasonable prices.


The stamping went great and I love this tone on tone look! Do you like it too?

Thanks Emma ♥ for having me here!
_____

Such a lovely mani!  I always love her subtle stamping looks, they're so delicate and pretty.  Thank you so much for the lovely guest post Deborah!  If you don't already, remember to go check out Love, Varnish, Chocolate, and More!

Wednesday, March 13, 2013

Guest Post: Nailed It

I'm spending the day in Zurich today, and tomorrow I'm off to Paris!!  Today's guest post comes from a blogger who's nail art I constantly oogle over and draw inspiration from, the lovely Katy from Nailed It! :)
_____

While Emma dances her way into the big leagues, she’s asked some bloggers to fill Globe & Nail with some content.

My name’s Katy, and I blog at Nailed It. Emma actually helped me by doing a guest post during one of my vacations in December. I’m excited to return the favor and get to meet some new readers!

Nailed It focuses primarily on nail art. While I do swatches and reviews, they’re always accompanied by some unique nail art. In keeping with that theme, I’ve got some fabric-inspired nail art to share today.


This look was inspired by a pin I’d saved from Spoonflower.com, a custom fabric site. I loved the colors (yellow’s my favorite) and the design was really fun to recreate.

I started with a base of My Boyfriend Scales Walls (OPI). Then I free-handed some little arrows in varying sizes and depths using Black Onyx (OPI) and some tape. After that all had time to dry, I taped off small strips on my nails and did a quick swipe of the jelly-licious Abbacadazzle (Sation). This thin yellow jelly worked perfectly for the effect, wouldn’t you agree? You can try similar looks with any color of jelly polish, but I love the way the yellow pops. As I mentioned, it’s my favorite.

Thanks for tuning in to Globe & Nail today to see Nailed It! You can follow Nailed It the blog, or check in on me through Twitter, Instagram, Facebook, Tumblr, Pinterest, OR Google+. Whew! Social media’s exhausting!

Best of luck in your auditions Emma, and thanks again for having me at Globe & Nail!
_____

I blame Katy for the hours of my life I predict I will lose to browsing Spoonflower; so many great ideas for nail art patterns!  Thank you so much for the guest post Katy, I absolutely love your nail art!  :)  If you don't already, please remember to go check out Katy's blog, Nailed It

Monday, March 11, 2013

Guest Post: The DIY Lady

Happy Monday!  Today I'm spending the day in Geneva, should be great!  I don't have a Castle Mani Monday post today, but I've got a guest post from a fabulous blogger and a fellow Castle lover.  It's Lizzy, though you may know her better as The DIY Lady!
_____

Hello Lovely People over here on Globe & Nail. 
My name is Lizzy, also known as The DIY Lady, and I'm honored to be a guest poster on Emma's blog today. 
When she contacted me and told me she'd like to know if I can come up with a post for her blog, I pretty much guffawed and said HECK YEAH LADY!!!! My Nails, On Your Blog?? SIGN ME UP!!! Lol... 
I mean, obviously, you guys here already know Emma has AMAZING nails and does amazing nail arts Especially her Castle Monday Nail arts ;-) 
Yes, I got completely hooked on Globe & Nail when I realized she was also a Castle lover like myself. Ohhhh Weee, Mixing Nails and a Fave show of mine? Yes yes yes!!

Anyhooo.. Today, I will be showing you a mani that was inspired by the polishes I used. 
I chose two Sinful colors polishes from their sugar rush Collection and stamped on them with Zoya - Purity with an image from Mash48. 


The two Sinful Colors polishes I used are Sweet Tooth and Sugar Spice. 
Pretty and bright polishes like these always make me think of Gradient nails, so I chose to do something close to gradients by using a brush to dab  on colors on top of each other. 


Yes, Dabbing on colors with my nail art brush is my lazy way of creating gradients/blending colors into each other. :-P

I Hope you guys like my final result as much as I did. The bright pastel - spring colors totally gave me a happy feel, and the polka dot stamped in different sizes appeared like the perfect stamp to pair it with. 


Above are all the goodies I used in creating this mani. 
Left to right: My Stamper, Zoya Purity, Sinful Colors, Sugar Rush, Sweet Tooth and my Holy Grail Topcoat Seche Vite. 
Scraper, Mash48, Clean up brush and the nail art brush I used to dab my colors on each other. 

And That's it for now sugars... 
Once again Emma, Thank you for having me on your blog, It is my pleasure creating this mani for this purpose. :-)
Have a wonderful, safe trip and I wish you success in the purpose of your tip. Have fun darling and KNOCK them out!!!

Till later, God Bless.
_____

Isn't she awesome?!  I always love reading Lizzy's posts, she has such an entertaining writing style!  If you don't follow her already, be sure to check out The DIY Lady!  Thank you so much for the guest post Lizzy!

Sunday, March 10, 2013

Guest Post: ChitChat Nails

First day of auditions for me here in Lausanne!!  Today's blog post comes to us from a fellow Canadian blogger who's unique skittlette manicures and beautiful photos are a constant source of inspiration to me!  I'm so honoured to have Marta from ChitChat Nails take over my blog today, take a look!  :)
_____

Hello Lovely Ladies,

My name is Marta and I run a little Canadian nail art blog called ChitChat Nails


Emma's long and beautifully manicured nails have been a nail crush of mine for a long time- and only recently did I discover just how young she is (in comparison to my 30+ years).  I feel sooo old now... not old enough to have walked to school for miles, uphill, both ways... but old :) .  Having learned just how young and accomplished Emma is only served to increase my fascination with Globe & Nail.  I will stop gushing now, but it truly is a distinct pleasure to be here, and I hope you like what I have created for this guest post.


I don't wear purples very often, but when I do I keep reaching for Cult Nails "Vicious".  That was my starting point for this manicure.  I then applied three coats of OPI "Mad As a Hatter" (I had to bring some bling in response to this very special guest post invite).  


For my middle finger and pointer I applied two coats of OPI "Steady as She Rose" and using the saran-wrap technique I added just a little bit of a shimmery silver: SueSa "02".  I then used Konad m70 twice: first with "Vicious" and then with Black stamping polish.  I added some small round BornPrettyStore.com studs to the ring finger to complete this look.


I wish Emma nothing but the VERY BEST at the auditions for pre-professional ballet schools and I hope you like this little 'skittlette' design in the meantime.

THANK YOU FOR READING!
_____

How amazing is this?  Marta has such a knack for creating her signature skittlette nail art looks!  Coincidentally, my favourite colour is purple so I'll definitely have to pick up a bottle of Vicious!  Thank you so much for guest posting today, Marta!!  :)

LinkWithin

Related Posts Plugin for WordPress, Blogger...